Use the Rule of Thirds to Place Strong Lines and Anchors
Use the rule of thirds to place horizons and visual anchors with purpose, then judge whether the grid strengthens the photograph’s structure.
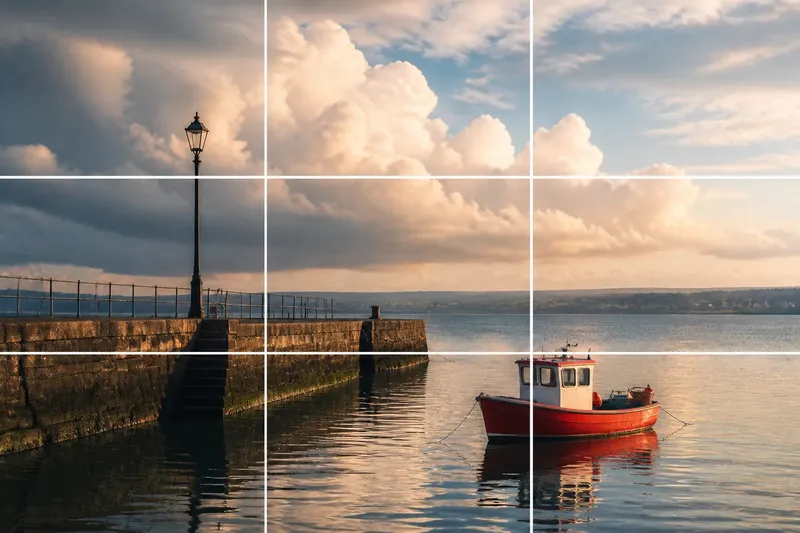
You raise your phone at the harbour wall and see the horizon cut across the middle of the screen. Switching on the grid makes the rule of thirds visible: two horizontal and two vertical guides divide the frame into nine parts. The grid is especially useful for placing strong lines and visual anchors, not simply for shifting a subject away from the centre.
What does the rule of thirds help you place?
The rule of thirds suggests aligning a prominent feature with one of the grid lines, or placing a focal point near an intersection. A horizon is an obvious example. A tall lamppost, a person at the edge of a street scene or the point where a path bends can also act as an anchor.
Think of the grid as a way to organise the frame’s larger structure. It helps you decide how much room the sky gets, where a vertical feature sits, and whether a focal point relates clearly to the surrounding shapes. It does not prescribe what the photograph should mean.
On a phone, turn on the composition grid in the camera settings. In a viewfinder, treat the displayed lines as temporary guides. They are not part of the photograph, and you can ignore them when a different arrangement makes the structure clearer.
How should you place a horizon?
Start by asking which part of the scene carries the visual weight. If cloud shapes, rooftops or the colour of the sky matter most, placing the horizon near the lower horizontal line gives that upper area more room. If reflections, boats or patterns in the water matter more, the upper line may suit the scene better.
This is not a contest between sky and ground. A horizon near the middle can still be right when the upper and lower halves have a clear relationship, such as a calm reflection. The grid helps you make the division deliberately; it cannot decide which half deserves attention.
Check that the horizon itself is level unless a tilt is intentional. Also look for poles, masts or building edges that might appear to grow out of another feature. The grid can help you notice where those lines meet, but the scene’s actual geometry should guide the final choice.
Where can vertical anchors sit?
For a vertical feature, a grid line can provide a useful reference. A person walking along a pavement might sit near one vertical line, while the direction of travel leads into the remaining space. A tower near the opposite line can give a streetscape a clear counterweight.
Look at what the anchor touches or aligns with. A lamppost that overlaps a roofline may become harder to read; shifting the camera a little can separate the shapes. In this kind of adjustment, you are refining the relationship between visible lines, not merely creating empty room around the subject.
Intersections are useful when several strong features meet. The corner of a roof, the end of a bridge or a person’s face may become a natural point of attention near one. If the intersection makes the frame feel forced, place the feature on a line or let it sit elsewhere.
How do you decide whether the grid improves the structure?
Compare a few frames while keeping your feet and camera position steady. Change only the framing or the tilt, so you can see what the line placement changes. Use the following checks to make a practical choice:
- Horizon: If the upper part of the scene is the main interest, place the horizon near the lower guide; if the foreground matters more, try the upper guide. If neither half dominates, keep a deliberate central division or reframe to show a stronger relationship.
- Vertical anchor: If a person or structure sits on a guide line and remains distinct from nearby shapes, keep that placement; if it merges with a pole or roof edge, shift your position or framing until the outlines separate.
- Intersection: If a focal feature near an intersection is easy to notice without obscuring another important line, retain it; if the meeting point looks crowded, move the feature along the guide or away from it.
- Level: If the horizon appears unintentionally sloped, straighten the camera; if a tilt is clearly part of the scene’s design, keep it and check that other verticals support the choice.
- Edge geometry: If a strong line runs into the frame and leads attention towards the anchor, preserve that route; if it points out of the frame, adjust your position or crop to redirect it.
- Competing anchors: If two prominent features occupy separate guides and each has a clear role, keep both; if they pull attention in different directions without a relationship, simplify the frame or choose one as the main anchor.
Say you are photographing an invented harbour scene with a bright cloud bank, a dark pier and a small red boat. Your starting frame puts the horizon through the centre, with the boat close to the middle. First, you turn on the phone grid and identify the cloud bank as the scene’s strongest feature. Next, you tilt the phone slightly down so the horizon sits near the lower guide, then shift the framing until the boat rests close to a vertical guide rather than an intersection. You check the horizon is level and that the pier does not run through the boat. In the resulting frame, the clouds occupy more of the image, while the boat remains a distinct anchor; if the pier still crossed its outline, the better trade-off would be to move sideways rather than keep adjusting the grid placement.
Which rule of thirds questions do photographers ask?
Should every horizon sit on a horizontal grid line?
No. A line near a guide can make the division of the frame feel deliberate, but a central horizon may suit a scene built around reflection or symmetry. Choose according to the relationship between the upper and lower parts.
Do I need to place the subject on an intersection?
No. An intersection is a reference point, not a target. A line placement or a position elsewhere can make the frame’s structure easier to read.
Can I use the rule of thirds for street photography?
Yes. It can help organise a person against buildings, road markings or other strong lines. Keep watching how those features overlap, since a grid position alone will not prevent confusing outlines.
Should I leave the camera grid switched on?
Leave it on if it helps you judge horizons and anchors quickly. Turn it off when the lines distract you from the scene’s geometry or encourage you to place every feature mechanically.
When is the grid doing useful work?
The rule of thirds earns its place when it clarifies the frame’s structure: a horizon divides the scene with intent, a vertical anchor relates to nearby lines, or an intersection brings attention to a meaningful feature. It is less useful when you follow it without checking what the lines and shapes are doing.
Next time you use the rule of thirds, identify one strong line and one anchor before composing. Then check whether their placement makes the scene easier to read. That small distinction turns a grid from a target into a tool.