A Small-Object Display for a Rainy Afternoon
A small-object display turns a handful of collected things into a temporary study, with a simple method for grouping, arranging and photographing them.
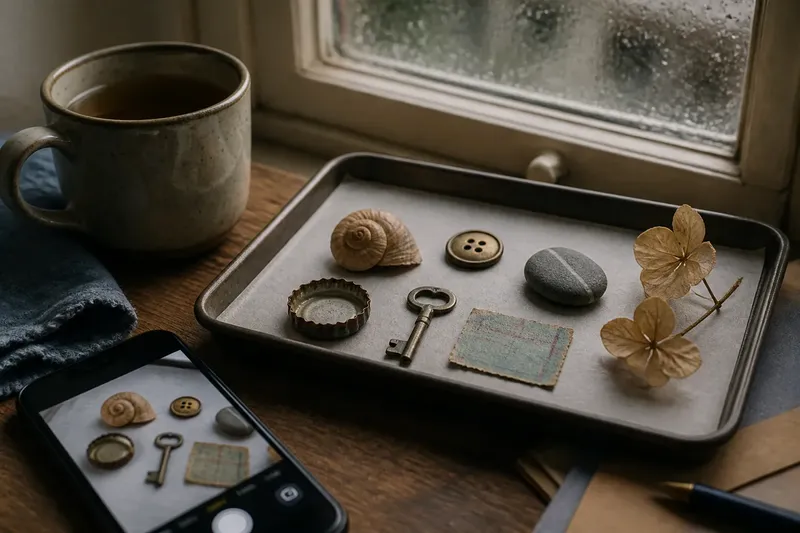
Rain taps the kitchen window while a handful of pocket-sized finds waits beside a tea mug: a shell, a button, a smooth pebble and a paper ticket. A small-object display gives these collected things a temporary meeting place. Choose one connection, try a few arrangements, photograph the result, then return each object to its usual home.
What is the one connection?
Start with a connection you can see, rather than a broad subject such as “things I like”. A visible link gives the arrangement direction without requiring a perfect match. Look for colour, shape, surface, use, place of discovery or the trace of a repeated habit.
Keep the group small enough to hold in your attention. A few objects can still disagree in useful ways: one may be bright among muted pieces, or curved beside several straight edges. The aim is not to prove that the objects belong together, but to notice what changes when they share a surface.
- Colour: collect objects with a similar blue, rust or cream tone.
- Shape: look for circles, points, loops or repeated curves.
- Surface: bring together rough, polished, soft or marked textures.
- Use: group small things once carried, worn, opened or used to fasten something.
- Place: choose objects associated with one ordinary route or room.
- Trace: notice scratches, fading, dents or other signs of handling.
Say you have a brass button, a bottle top and a small key gathered from a coat pocket. If you choose “things that fasten or close”, the key may sit slightly apart from the others; the group’s visible result could be a loose sequence from fastening cloth to sealing a container to turning a lock. That reading is one possible arrangement, not a claim about where the objects came from.
Which objects are easy to work with?
Choose pieces that can rest safely on a clear table, tray or sheet of plain card. A shallow baking tray keeps small items from rolling away. A sheet of white or grey paper can make their edges easier to see, while a wooden board brings its own grain and colour into the scene.
Before arranging, check for dirt, loose parts or delicate finishes. Leave anything fragile, sharp, damp or valuable out of the session if handling it would be a concern. The display is temporary; it does not need rare or precious material. Ordinary finds often give the eye more room to compare shape and texture.
Lay the objects out without arranging them first. Turn each one once or twice, then notice which feature catches your attention: a worn edge, a stamped mark, a curl, or a colour that changes in the room’s light. This first look helps you choose a connection grounded in the objects themselves.
How can you test an arrangement?
Begin with a loose cluster on the chosen surface. Put the object with the clearest version of your connection where you can see it, then place the others nearby. Avoid trying to make every piece equally prominent. A display becomes easier to read when some objects act as visual companions rather than competing for attention.
Change one thing at a time. Turn a piece to show its side, move two objects closer, or put the brightest item at the edge. After each change, step back or look at the arrangement through your phone screen. Ask a plain question: can you still see the connection you chose, and does another connection now appear more interesting?
Try a second arrangement with a different relationship. A row makes similarities easy to compare; a compact cluster can suggest a shared group; a gentle curve may echo rounded forms. These are starting points, not rules. If the objects look stiff, let them sit at slightly different angles. If they feel scattered, bring the pieces that carry the chosen connection nearer one another.
A phone camera is useful for checking the whole composition, even before you make the final picture. The screen reduces the scene to a small rectangle, which can reveal a gap, an awkward overlap or a distracting edge that is less obvious while looking down at the table. Move the phone rather than rearranging everything at once.
What should you photograph before clearing the table?
Use the camera already to hand. Wipe the lens with a clean, soft cloth, then hold the phone steadily above or beside the display. Choose a view that shows the objects and enough of the surface to make their arrangement legible. A straight-down view suits a flat grouping; a lower angle can reveal thickness and raised details.
Look around the frame before taking the picture. Remove unrelated clutter that distracts from the objects, but do not erase every trace of the setting if the tabletop or paper helps explain the display. Check the corners for a mug, loose string or sleeve that has wandered into view. Tap the main object on the screen if the camera’s focus seems uncertain.
Take a photograph before making another adjustment, then compare it with the arrangement in front of you. The image can preserve a choice you might otherwise forget: a small gap, a turned edge or the way one object leans towards another. If the picture feels confusing, change only the part that is hard to read and photograph once more.
Which small choices make the session easier?
- Set a boundary: use a tray or card so the display stays contained.
- Name the connection: write a short phrase on scrap paper, such as “worn edges” or “things from the walk home”.
- Keep a spare surface nearby: move unused objects there instead of letting them crowd the arrangement.
- Check the camera frame: use the screen to spot overlaps and intrusions before taking a picture.
- Save the image with a clear name: include the connection or date in the filename if you want to find it later.
- Return pieces to their usual place: use a small dish or envelope while clearing the surface.
These choices keep the exercise light. They also make it easier to stop when the display has said enough. You do not need to keep adjusting until every object appears carefully placed; a photograph of an unfinished-looking arrangement can still record a genuine act of looking.
What might you ask while arranging the objects?
How many objects should I choose?
Choose enough to show a relationship, but few enough to compare without losing track of each piece. If the connection disappears beneath the group, remove an object and look again.
Does every object need to match?
No. One contrast can make a connection easier to notice, such as a pale object among darker surfaces. Keep the contrast if it sharpens the group; set it aside if it pulls attention away.
Should I use a special background?
Start with a surface already nearby, such as plain paper, a tray or a clear table. Change it only if its colour or pattern makes the objects difficult to see.
What should I do with the photograph afterwards?
Keep it in a small collection of personal observations, or delete it once it has served as a record. If you keep it, a brief note about the connection can help you remember what you were looking for.
How do you finish without turning it into a project?
Take one final look at the display, then return the objects to their containers, drawers or shelves. Put the photograph somewhere you can find it if you want to compare later arrangements. There is no need to build an archive or repeat the exercise on a schedule.
A small-object display is useful precisely because it can be temporary. The objects go back to ordinary use, but the chosen connection may linger: next time a button, pebble or ticket catches your eye, you may notice a shape or surface you would have passed over before.